31 December 2007

Birdbath


Setting the scenes around the studio was another step. My inherited birdbath served well as a model for some eventual paintings not to mention a good respite for my bird friends. Rolling the pedestal and heaving the basin was a major ordeal. Who knew birdbaths were so heavy? Not me!

30 December 2007

Interior Decoration


I had been hunting for cushions for the bench we'd made that would be firm and thick and resilient. The best prices I could find for a good quality foam were really astronomical (for me) and with cover, I was looking at over $500 which was too, too much. So I procrastinated doing anything until one day, at a moving sale, I found four mighty down sofa cushions wrapped in high quality foam and in cotton duck zippered covers that just so happened to fit the dimensions of the bench perfectly. I bought those plus a set of Euro square pillows for $50. Then I found a bolt of fabric at the local salvage store for $6 and some curtains at another yard sale for $2.


Then I found a bolt of fabric at the local salvage store for $6, some curtains at another yard sale for $2 and a happy heavy striped cotton rug at yet another yard sale for $3.


Ah.... Now that's what I'm talking about!

29 December 2007

Setting up for work


Here's my basic work set up for drawing and watercolor.


Ah... look how clean and uncluttered!

28 December 2007

Moving in


The first thing to go in is the drawing table. Most important! 
Then a sweet little English antique chair that I picked up for a song somewhere along the way.

27 December 2007

Waste Not, Want Not


One part of this project I am quite proud of is that there was very little waste. Sure, there were several trash bins full of scrap wood, siding, a few bits of plastic and snippets of this and that. All of the excess lumber I either put to use myself or gave away. The final pile of remnants went for one decent price at my yard sale this year.

I only needed two things hauled away. One was the dribbles of hardened and heavy cement that Willie left. A friend's son hauled that away in several pickup truck loads. The other was a pile of dirt that the, ahem, "graders" left. That really took a while. I waited more than a month on the neighborhood yard guy who promised me he'd get to it. Finally, I put it on craigslist and some fellow came with his wife and kids and shoveled the whole pile into his pickup truck (also several loads) and made use of it elsewhere.

26 December 2007

Finishing up


Looking good! A little clean up and this and that and it's just about time to move in!

25 December 2007

Loft Floor


I had big ideas for the loft floor and bought these packs of stick'um floor squares on clearance at Home Depot. But after I got them home and opened one, I thought, what am I doing? I have a perfectly serviceable rug I can lay over this plywood I sealed and painted and why should I spend more money on this cheap flooring for a space that's mostly going to be used for storage. So back to Home Depot they went and I have a very happy loft floor without them.

24 December 2007

The Ladder


Here's my sweet ladder. The top is bolted through the wall to the support beam of the loft floor. It's made from pine 2 x 4s and red oak 1 x 4s. The carpenter who cut and pieced it together made a couple of errors in settings after I obsessed over getting the measurements just right (of course!). He said, "Perfection is expensive!". I had no comeback for that remark so I figured out a way to make it work so that the errors were minimized and it's just fine. I'm the only one who climbs up and down it anyway, and I love the way it looks.

23 December 2007

The bench


As I sat on the grass in January, obsessing over the exact siting of this building, I dreamed of this bench. I am sitting on it right this very minute as I write this post. The sun is pouring in and I absolutely love this spot.

Below, you can see the little recess where the water pipes come into the building. One of the carpenters cut and finished a nice little piece to cover that space. It's good for sitting on and later, you'll see that I make my own book shelves.


But for now, I was thrilled with the construction of the bench which could not have been more simple or inexpensive. One of the employees at Home Depot gave me instructions on exactly how to construct this. Between the handyman and myself , we put this together in an hour or so.

22 December 2007

Table and Chairs


A trash picker from way back (why let perfectly good things go to waste?), a part of my psyche is always tuned to finding treasure in unlikely places. One day, bringing some animal or other into the Vet, I spied these chairs and two very nice tables stacked on the street in front of the office. The Vet's brother (who turned out to be an exceptional sculptor) was selling the lot for $50. We shook hands on $40 and he delivered them to me himself. A good deal for perfect studio furniture!

21 December 2007

Trim


We only had to trim the wall base and the doors because I'd had the drywall wrapped around the windows. No need for any extra trim in a studio — that's was my thinking. The same carpenter who'd put up the shelves and would later cut and assemble the ladder cut and instructed me on attaching baseboard. He also cut some nice wood pieces for the thresholds to make a smooth transition. It was a fun and simple job on a beautiful day and I learned how to use a nail gun.

20 December 2007

Shelves!


I had been given a few pieces of choice shelving planks at the tail end of some yard sale. Now I could finally use them. This was a fun project especially because I had worked out the dimensions at the framing stage driving J. (and myself) crazy by making sure that the areas were measured correctly. And they were!


The same carpenter who helped me install the trim cut these pieces and patiently constructed the paper shelf unit after my scribbles and instructions. The entire system has worked like a dream.

19 December 2007

Sink and Counter


Another Home Depot assemblage from the standard under cabinet to the counter top, sink, faucet and drain covers. One of the handymen set up the cabinet, cut the counter top and set the sink. I made all the fine adjustments that have to be made for those pre-cut cabinet drawers and doors to sit right.

The plumber managed the hot water heater faucets and drains. He complained about the way the sink was set but it works just fine. By that time I was used to one workman criticizing a previous workman's work.

18 December 2007

Finishing work


This was the staging area for sawing and sanding and what-not of most of the finishing work. Come to think of it, I'll bet that's why this section of earth has had the most difficult time recovering.

17 December 2007

Appliances


The track lighting had been installed and you'll see glimpses of that over the next couple of weeks. I bought a very simple style of track light spots — the least expensive, too — at the local Home Depot where they had set me a special chair by the customer service counter (just kidding, but barely). Then the fan! I spent a lot of time selecting just the right fan and finally selected a beautiful Minka-Aire Concept 1 fan with an optional center light and reversible directions. I love it.

I also had to find the right air conditioner / heater. I needed a unit that would easily heat and cool the large space, be energy and cost efficient and relatively quiet. I was happy to find a good Fedders model AEY 18F7G from a great company in California, Genie Air. Even with shipping, I paid a lower price than I would have anywhere else with any sort of discount. It's not rated the most efficient but not the least either. It's a 9.7 and considering the high ceiling and the cement slab foundation does a damned good job. I think that radiant floor heat is the way to go but for this project that was not an option. I turn the unit off after it cools down or heats up the place. Under 40 degrees, especially down around freezing, I have to keep it running when the sun is not shining. I have good passive solar on sunny days from the south windows and door in the back room.


For hot water at the sink, I bought an Ariston GL2.5 Point-of-Use Electric Mini-Tank Water Heater through Amazon where I found it at the best price. It's perfect and gives me just the right amount of hot water to wash the glasses and plates.

16 December 2007

The path


I moved these pavers more times than I would have liked to but we finally got them settled in their good spots. We all loved the curve the path took. Fitting the nine bricks into the gap between the pavers gave me great admiration for brick workers.

15 December 2007

Tom's Truck


Way back when J. quit and I was momentarily destabilized, I called my friend Tom Kimmel to tell him that I'd take him up on his offer to loan me his truck. He said, and I quote, just keep it as long as you need to. Apparently I needed to keep it for about 3 months. Tom's loan of his truck to me was the single most empowering event throughout this experience. It was amazing how quickly I became adept at tooling around in the pick up. The two most important things were first that someone would be kind enough to extend such trust and generosity in the midst of my chaos and second that I could go do and pick up anything I needed to in the course of the building without waiting for or relying on someone I'd have to hire. I heaved and hoed bricks and lumber and trim and dirt and plants and god know's what else. A great liberation to be able to do it on my own. Thanks again, Tom!

14 December 2007

The fence at the end of the drive

The other thing I was able to do now that the trucks were gone was to close off the end of the drive for privacy in the front of the studio. The fence posts were set. I picked up 3 more panels at Lowe's and was able to tip them out of the back of the pick up on my own. The pickup? Stay tuned for tomorrow's post


One of the handymen and I attached two of the panels with some lattice at the top to match the rest of the fencing. I left enough space to drive a car through between the house and the edge of the fence just in case.

The third panel went to a single section for privacy behind the shed portion of the studio. That will show up in an eventual post.


13 December 2007

Shrubs


You can't make a building without considering the site. Hence, these bits about the grounds.

I had been waiting to plant a hedge until all of the trucks were through. So the trucks were gone and my shrub stash was ready to take possession of their new home. I wanted an evergreen foundation that would grow quickly and thrive and act as a natural fencing element. Elaeagnus is non-native and invasive but it's a good retreat for wildlife, produces berries for birds and fragrant blooms several times a year. Because I wanted a more wild, less cultivated look, and because I was planting in a straight line, I thought that by varying the plants I might creat more interest. I planted several elaeagnus, then a red-tipped photinia and then several wax-leaf privet (which have fragrant blooms at different times than the elaeagnus).

Anchored by leyland cyprus at far corner that will soon become a giant.

The view from the studio is surprisingly expansive for the neighborhood. I wanted to keep the view but needed protection and privacy so chose to use wire fence to supplement the young shrubs. It's virtually invisible but keeps strangers from strolling through the yard as a short cut (or for more nefarious reasons) and was definitely in keeping with my shoestring budget.

11 December 2007

Weeds and Seeds


Not a pretty sight, eh? I admit it. I became obsessed with crabgrass. After all of the clover seed I spread (and I spread a lot of it) I could not, for the life of me , figure out how this crabgrass entered the scene. Later I learned, as I mentioned in yesterday's post, that the weed seed came in with the hay. Hey!

I like to let things run on the wild-ish side and a weed is only a plant that you'd rather not have in the place where it takes root but I battled this crabgrass like my Aunt Nancy used to battle her squirrels. What I learned is that crabgrass is an extremely intelligent plant and I am not kidding. It was as if it knew when I was going to try to dig it up and propagated itself as I approached. In any event, I was finally reminded by some biodynamic landscapers that the crabgrass is just a sign of the earth healing itself. So I let that obsession go and turned my attention to the beginnings of my perennial beds.

These modest beginnings have yielded some sturdy returns and I've learned what's good for these parts and what is least likely to survive. Any sort of salvia takes off with a fertile vengeance for life. The anise hyssop makes a great party for a wide variety of bees and other colorful, happy flying bugs. You can see what I've cut back after the second summer on yesterday's My Great Day blog.

10 December 2007

Meanwhile, in the lower 40...


I was up early and often with the rake and trusty wheel barrow. The light was so beautiful this particular morning. Hard labor but enjoyable.

Now, a word about hay. Don't use it unless you know the parents and its family background. I'm not kidding. This particular batch of hay (and the hay my next door neighbor used about this time for his own project) was teeming with weed seeds. Crabgrass varieties to be more exact. Not a good thing. Just seed at the right time of year before a rain and let nature take its course.

09 December 2007

The Floor


If someone had told me that I would be installing a floor by myself any time up to the day I decided that I was going to do it, I would have laughed out loud. Be that as it may, after painting the interior, I sealed the cement floor with another 5 gallon bucket of oops! tinted cement sealer that I bought for another $15 (daily trips to Home Depot would occasionally pay off).

After considerable research and shopping around, I bought underlayment and pseudo pergo click and lock floor panels on clearance at Home Depot. I think the whole shebang cost me about $500.

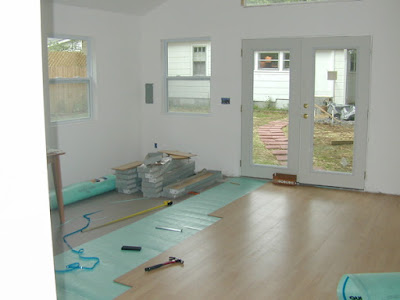
I started in the far corner of the supply room:


(see the pex tubing for the plumbing?) I cut the floor panels (rather roughly, I'm afraid) where I had to with a little jigsaw. Then I worked my way out through the main room


and around to the back.


I set myself 3 hour daily sessions so that I wouldn't burn myself out trying to do it all at once. I finished in 3 days. Yes, I consider this one of my greatest accomplishments! I just put my mind to it and I did it.

08 December 2007

Painting


D.I.Y. now took on an entirely new depth of meaning. I painted the entire inside alone. I had a good time doing it, although the high ceilings were a challenge, and was very pleased with the results. To reach the highest parts of the main room ceiling I used ladders and extension poles and let myself not worry too much about covering every millimeter inside the high angle.

For the main room I used plain white ceiling paint because I found a 5 gallon bucket for $15 in the oops! paint section,. I think that the lid was damaged or something but the paint was just fine. For the loft I used other oops! paint I'd picked up along the way and hand mixed the pale yellow for the supply room and desert pink for the back room from left overs and colored quarts.

07 December 2007

Ditches


I was through with hiring contractors. I needed to solve the problem of water flowing towards the house and studio. So I figured out where the problem areas were, carefully read instructions on how to make drainage ditches, bought some perforated plastic drainage tubing and worked out a system: a French drain for the length of the front of the studio and buried plastic drains to perforated drains from the back of the house gutter pipes.

I called up the manager of the men's mission in town and had him find two good laborers for me. I picked up two men at the crack of dawn and we spent the day digging trenches together, laying drainage tubing and gravel and then covering it back up. I bought us all a big pizza lunch and after work snacks. They were two of the best workers I had throughout and you know they weren't expensive.


In the above photo, you can see a pile of of shoes and boots. I do not want to tell you how many pairs I went through over the course of the building! Dirt inside the shoes and boots. Dirty feet. Dirty floors.